Toyota Sienna 2010-2024 Owners Manual: Customizable features
- Settings that can be changed using the audio system screen
- Settings that can be changed using the multi-information display
- Settings that can be changed by your Toyota dealer
Definition of symbols: O = Available, – = Not available
Gauges, meters and multi-information display (, 93)
- Vehicles with monochrome display

- Vehicles with color display


*1: For details about each function: , 97 *2: The default setting varies according to country.
*3: Customized items are the following items except for default setting items: average fuel economy, tank average fuel economy, trip average fuel economy, current fuel economy, distance to empty, trip distance, distance, trip elapsed time, elapsed time, trip average speed, average speed, blank.
*4: Some status screens cannot be registered (indicated on multi-information display).
*5: Speed limit display may not be available for some regions.
*6: If equipped
Door lock

Smart key system* and wireless remote control

*: If equipped
Smart key system*

*: If equipped
Wireless remote control
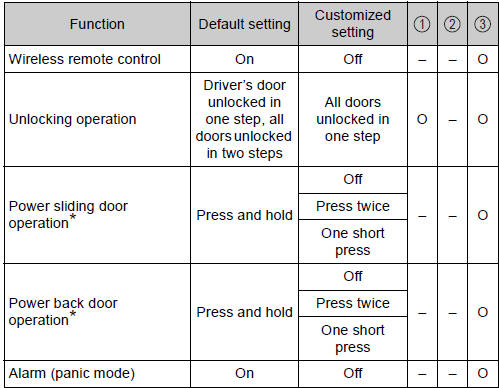
*: If equipped
Power sliding door*

*: If equipped
Driving position memory*

*: If equipped
Automatic light control system

*1: If equipped
*2: U.S.A. only
Intuitive parking assist*1
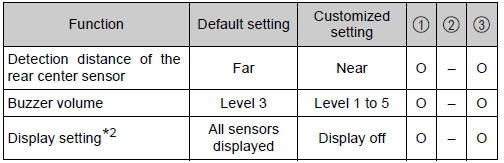
*1: If equipped
*2: When intuitive parking assist is operating.
Automatic air conditioning system

Illumination

*: If equipped
Seat belt reminder

Vehicle customization
- When the speed-detecting automatic door lock and shift-linked automatic door lock are both on, the door lock operates as follows:
- When shifting the shift position to any position other than P, all the doors will be locked.
- If the vehicle is started with all the doors locked, the Speed linked door locking function would not operate.
- If the vehicle is started with any door unlocked, the Speed linked door locking function will operate.
- When the smart key system is off, the entry unlock function cannot be customized.
- When the doors remain closed after unlocking the doors and the timer activated automatic door lock function activates, signals will be generated in accordance with the operation buzzer volume and operational signal (Emergency flashers) function settings.
When customizing on the audio system screen
Stop the vehicle in a safe place, apply the parking brake, and shift the shift lever to P. Also, to prevent battery discharge, leave the engine running while customizing the features.
| WARNING During customization As the engine needs to be running during customization, ensure that the vehicle is parked in a place with adequate ventilation. In a closed area such as a garage, exhaust gases including harmful carbon monoxide (CO) may collect and enter the vehicle. This may lead to death or a serious health hazard. |
| NOTICE During customization To prevent battery discharge, ensure that the engine is running while customizing features |
 Customizing vehicle features
Changing using the audio system screen
Audio system with “CAR” button
Press the “SETUP” button.
Select “Vehicle” on the “Setup” screen.
Audio system with “APPS” b ...
 Initialization
Items to initialize
The following items must be initialized for normal system operation
after such cases as the battery being reconnected, or maintenance
being performed on the vehicle.
...
Other materials:
Installation
1. INSTALL TRANSMISSION CONTROL CABLE ASSEMBLY
(a) Pull in the control cable to the body.
(b) Install the cable end, as shown in the illustration.
(c) When installing the transmission control cable
assembly on the shift lever plate, place the
projection of the shift cable downward to ...
Disassembly
1. REMOVE STOP LIGHT SWITCH ASSEMBLY
(a) Turn the stop light switch assembly
counterclockwise and remove the stop light switch
assembly.
(b) Remove the stop light switch mounting adjuster
from the brake pedal support sub-assembly.
2. REMOVE STOP LIGHT SWITCH CUSHION
(a) Remove the stop ligh ...
Removal
1. PRECAUTION
CAUTION: Be sure to read "PRECAUTION" thoroughly before
servicing.
2. DISCONNECT CABLE FROM NEGATIVE BATTERY
TERMINAL
CAUTION:
Wait for 90 seconds after disconnecting the cable to
prevent the airbag working.
3. REMOVE FRONT SEAT ASSEMBLY (for Manual Seat)
4. REMOVE ...
