Toyota Sienna Service Manual: Inspection
1. INSPECT OUTER REAR VIEW MIRROR ASSEMBLY LH (w/o Memory)

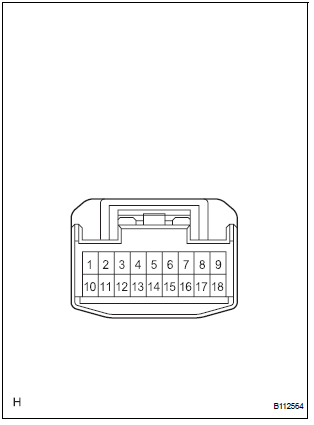
- Disconnect the mirror connector.
- Check operation of the outer mirror.
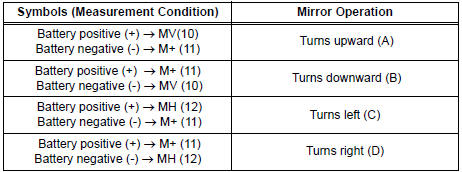
- Apply battery voltage and inspect operation of the mirror face, as shown in the table and illustration.
Standard (LH)

If the result is not as specified, replace the mirror assembly.
2. INSPECT OUTER REAR VIEW MIRROR ASSEMBLY RH (w/o Memory)
- Disconnect the mirror connector.

- Check operation of the outer mirror.
- Apply battery voltage and inspect operation of the mirror face, as shown in the table and illustration.
Standard (RH)

If the result is not as specified, replace the mirror assembly.
3. INSPECT OUTER REAR VIEW MIRROR ASSEMBLY LH (w/ Memory)

- Disconnect the mirror connector.
- Check operation of the outer mirror.
- Apply battery voltage and inspect operation of the mirror face, as shown in the table and illustration.
Standard (LH)
If the result is not as specified, replace the mirror assembly.

- Check operation of the EC mirror.
- Apply battery voltage and inspect operation of the mirror face, as shown in the table and illustration.
Standard (LH)

If the result is not as specified, replace the mirror assembly.
- Check of the retract function.
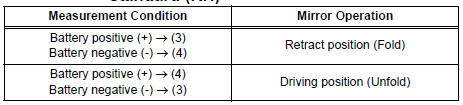
- Apply battery voltage and inspect operation of the mirror, as shown in the table and illustration.
Standard (LH)

If the result is not as specified, replace the mirror assembly.
4. INSPECT OUTER REAR VIEW MIRROR ASSEMBLY RH (w/ Memory)
- Disconnect the mirror connector.
- Check operation of the outer mirror.

- Apply battery voltage and inspect operation of the mirror face, as shown in the table and illustration.
Standard (RH)

If the result is not as specified, replace the mirror assembly.

- Check operation of the EC mirror.
- Apply battery voltage and inspect operation of the mirror face, as shown in the table and illustration.
Standard (RH)

If the result is not as specified, replace the mirror assembly.

- Check of the retract function.
- Apply battery voltage and inspect operation of the mirror, as shown in the table and illustration.
Standard (RH)
If the result is not as specified, replace the mirror assembly.
 Removal
HINT:
On the RH side, use the same procedures as on the LH side.
1. REMOVE FRONT DOOR SERVICE HOLE COVER LH
Remove the front lower frame bracket garnish LH.
Remove the front door i ...
 Installation
1. INSTALL OUTER REAR VIEW MIRROR ASSEMBLY LH
Install the mirror with the 3 nuts.
Torque: 8.0 N*m (82 kgf*cm, 71 in.*lbf)
Connect the connector.
...
Other materials:
Inspection
1. INSPECT UNDERDRIVE PLANETARY GEAR PRELOAD
(a) Using SST, fix the underdrive planetary gear
assembly.
SST 09387-00050
(b) Using SST and a torque wrench, measure the
turning torque of the underdrive planetary gear
assembly while rotating the torque wrench at 60
rpm.
SST 09387-00050
...
Short to GND in Driver Side Squib 2nd Step Circuit
DTC B1182/19 Short to GND in Driver Side Squib 2nd Step Circuit
DESCRIPTION
The driver side squib 2nd step circuit consists of the center airbag sensor
assembly, the spiral cable and
the steering pad.
The circuit instructs the SRS to deploy when deployment conditions are met.
DTC B1182/19 ...
Installation
1. INSTALL REAR NO. 2 SEAT ASSEMBLY
Lock the seat leg rear to the floor striker.
Lock the seat leg front to the floor striker.
Install the rear No. 2 seat assembly with the 6 bolts.
Torque: 19 N*m (194 kgf*cm, 14 ft.*lbf)
NOTICE:
Tighten the bolts in the order sho ...
