Toyota Sienna Service Manual: Removal
1. PRECAUTION
CAUTION: Be sure to read "PRECAUTION" thoroughly before servicing.
2. DISCONNECT CABLE FROM NEGATIVE BATTERY TERMINAL
CAUTION: Wait for 90 seconds after disconnecting the cable to prevent the airbag working.
3. REMOVE STEERING WHEEL NO.3 COVER LOWER
- Using a screwdriver, remove the steering wheel No.3 cover lower.
HINT: Tape up the screwdriver tip before use.
4. REMOVE STEERING WHEEL NO.2 COVER LOWER
- Using a screwdriver, remove the steering wheel No.2 cover lower.
HINT: Tape up the screwdriver tip before use.
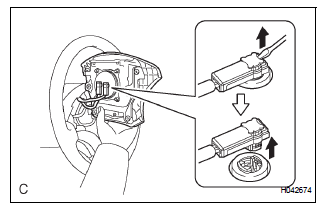
5. REMOVE STEERING PAD
- Using a "torx" socket wrench (T30), loosen the 2 "torx" screws until the groove along the screw circumference catches on the screw case.

- Pull out the steering pad from the steering wheel
assembly and support the steering pad with one
hand as shown in the illustration.
NOTICE: When removing the steering pad, do not pull the airbag wire harness.
- Disconnect the horn connector.
- Disconnect the 2 connectors from the steering pad.
NOTICE: When handling the airbag connector, take care not to damage the airbag wire harness.
- Remove the steering pad.
 On-vehicle inspection
1. INSPECT STEERING PAD (VEHICLE NOT INVOLVED IN COLLISION)
Perform a diagnostic system check.
With the steering pad installed on the vehicle,
perform a visual check. If there are any defe ...
 Installation
1. INSTALL STEERING PAD
Support the steering pad with one hand as shown in
the illustration.
Connect the 2 connectors to the steering pad.
NOTICE:
When handling the airba ...
Other materials:
Data list / active test
HINT:
By accessing the DATA LIST displayed on the intelligent
tester, you can perform such functions as reading the values
of switches and sensors without removing any parts. Reading
the DATA LIST as the first step in troubleshooting is one
method to shorten labor time.
1. DATA LIST FOR CENTER ...
Installation
1. INSTALL YAW RATE AND DECELERATION SENSOR
(a) Connect the yawrate sensor connector.
(b) Install the yawrate sensor with the 2 bolts.
Torque: 13 N*m (136 kgf*cm, 10 ft.*lbf)
2. INSTALL COWL SIDE TRIM BOARD RH
(a) Install the nut with the cowl side trim board plate
RH.
3. INSTALL FRONT ...
Removal
1. REMOVE BATTERY (See page EM-26)
2. REMOVE NO. 2 AIR CLEANER INLET (See page EM-
28)
3. REMOVE AIR CLEANER CAP SUB-ASSEMBLY (See
page FU-13)
4. REMOVE AIR CLEANER FILTER ELEMENT (See page
EM-28)
5. REMOVE AIR CLEANER CASE SUB-ASSEMBLY (See
page EM-28)
6. REMOVE AIR CLEANER BRACKET
(a ...
