Toyota Sienna Service Manual: DTC check / clear
HINT:
- Illustrations may differ from the actual vehicle depending on the device settings and options. Therefore, some detailed areas may not be shown exactly the same as on the actual vehicle.
- If the system cannot enter the diagnostic mode, inspect all AVC-LAN communication components and repair or replace problem parts.
- After the ignition switch is turned ON, check that the map
is displayed before starting the diagnostic mode.
Otherwise, some items cannot be checked.
1. START DIAGNOSTIC MODE
- There are 2 methods to start diagnostic mode. Start the mode by using one of them.
- Method 1
- Start the engine.
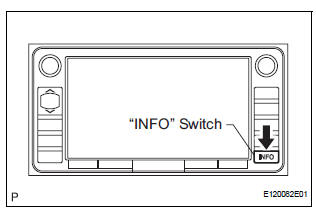
- While pressing and holding the "INFO" switch,
operate the light control switch: OFF
 Turn ON
 Turn OFF
 Turn ON
 Turn OFF
 Turn
ON
Turn
ON  Turn OFF.
 - The diagnostic mode starts and the "System Check Mode" screen will be displayed. Service inspection starts automatically and the result will be displayed.
- Method 2
- Start the engine.
- Switch to the "Display Check" screen.
- From the display quality adjustment screen,
touch the corners of the screen in the following
order: upper left
 lower left
 upper left
 lower left
  upper left
 lower left.
 - The diagnostic mode starts and the "System Check Mode" screen will be displayed. Service inspection starts automatically and the result will be displayed.
2. FINISH DIAGNOSTIC MODE
- There are 2 methods to end diagnostic mode. Use one of them.
- Turn the ignition switch off.
(2) Press and hold the "DISP
- switch for 3 seconds.
3. DIAGNOSIS MENU
- The "Diagnosis MENU" screen will be displayed by pressing the menu switch on the "System Check Mode" screen
4. CHECK DTC
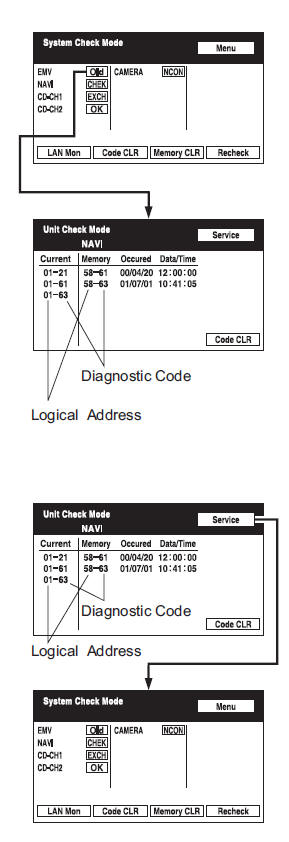
- Read the system check result.
- If the check result is "EXCH", "CHEK" or "Old", touch the displayed check result to view the results on the "Unit Check Mode" screen and record them.
HINT:
- If all check results are "OK", go to communication DTC check.
- If a device name is not known, its physical address is displayed.
HINT: When proceeding to view the results of another device, press the service switch to return to the "System Check Mode" screen. Repeat this step.
- Read the communication diagnostic check result.
- Return to the "System Check Mode" screen, and press the "LAN Mon" switch to enter the "LAN Monitor" screen.
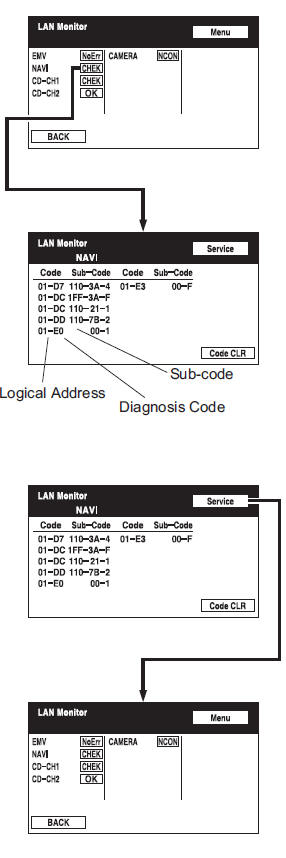
- If the check result is "CHEK" or "Old", touch the displayed check result to view the results on the individual communication diagnostic screen and record them.
HINT:
- If all check results are "No Err", the system judges that no DTC exists.
- The sub-code (relevant device) will be indicated by its physical address.
- When proceeding to view the results of
another device, press the "Service" switch to
return to the original "LAN Monitor" screen.
Repeat this step.
5. DTC CLEAR/RECHECK
- Clear DTC
- Press the "Code CLR" switch for 3 seconds.
- The check results are cleared
- Recheck
- Press the "Recheck" switch.
- Confirm that all diagnostic codes are "OK" when the check results are displayed. If a code other than "OK" is displayed, troubleshoot again.
- Press the "LAN Mon" switch to change to the "LAN Monitor" screen.
- Confirm that all diagnostic codes are "No Err". If a code other than "No Err" is displayed, troubleshoot again.
 Terminals of ECU
1. RADIO AND NAVIGATION ASSEMBLY
*1: with Rear Seat Entertainment System
Reference: waveform 1
HINT:
Terminal: VV+ - VV-
Gauge set: 200 mV/DIV, 10 μ ...
 Diagnostic trouble code chart
COMMUNICATION DIAGNOSIS:
SW:
SW WITH NAME:
SW CONVERTING:
COMMAND SW:
FRONT MONITOR:
DVD PLAYER:
TELEPHONE:
NAVI:
IN-DASH CD CHANGER:
GPS:
CAMERA U ...
Other materials:
Touch screen gestures
Operations are performed by touching the screen directly with your
finger.
Operation method
Outline
Main use
Touch
Quickly touch and
release once.
Changing and selecting
various settings.
Drag*
Touch the screen
with your ...
Read vin (vehicle identification number)
(a) The VIN reading process is shown in the flowchart
below. Reading the VIN stored in the ECM is
necessary when comparing it to the VIN provided
with the vehicle.
(b) Read the VIN using the intelligent tester.
(c) Check the vehicle's VIN.
(d) Connect the intelligent tester to the DLC3.
...
Problem symptoms table
HINT:
Before inspecting the suspected areas listed in the table
below, check the fuse and relay.
Before inspecting the suspected areas listed in the table
below, check the DTCs.
Methods used to verify the cause of the problem are listed
in order of probability in the ...