Toyota Sienna Service Manual: Front seat frame with adjuster
Inspection
1. INSPECT FRONT SEAT ADJUSTER SUB-ASSEMBLY LH
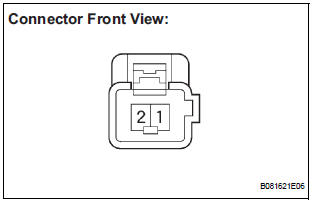
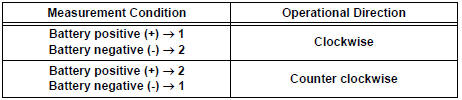
- Check operation of the seat frame (slide motor).
- Check if the seat frame moves smoothly when the battery is connected to the slide motor connector terminals.
OK
If the result is not as specified, replace the seat frame with adjuster.

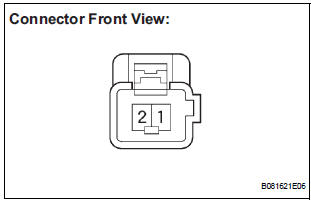
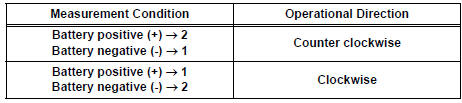
- Check operation of the seat frame (front vertical motor).
- Check if the seat frame moves smoothly when the battery is connected to the front vertical motor connector terminals.
OK

If the result is not as specified, replace the seat frame with adjuster.

- Check operation of the seat frame (lifter motor).
- Check if the seat frame moves smoothly when the battery is connected to the lifter motor connector terminals.
OK

If the result is not as specified, replace the seat frame with adjuster.

- Check operation of the seat frame (reclining motor).
- Check if the seat frame moves smoothly when the battery is connected to the reclining motor connector terminals.
OK

If the result is not as specified, replace the seat frame with adjuster.
2. INSPECT FRONT SEAT ADJUSTER SUB-ASSEMBLY RH
- Check operation of the seat frame (slide motor).
- Check if the seat frame moves smoothly when the battery is connected to the slide motor connector terminals.
OK

If the result is not as specified, replace the seat frame with adjuster.

- Check operation of the seat frame (reclining motor).
- Check if the seat frame moves smoothly when the battery is connected to the reclining motor connector terminals.
OK
If the result is not as specified, replace the seat frame with adjuster.
 Power seat switch
Inspection
1. INSPECT FRONT POWER SEAT SWITCH
Inspect the driver side power seat switch.
Measure the resistance according to the
value(s) in the table below.
Standard resista ...
 Front power seat lumbar switch
Inspection
1. INSPECT FRONT POWER SEAT LUMBAR SWITCH
Measure the resistance according to the value(s) in
the table below.
Standard resistance
If the result is not as specified ...
Other materials:
Light Sensor Circuit Malfunction
DTC B1244 Light Sensor Circuit Malfunction
DESCRIPTION
This DTC is output when failure in the light sensor circuit is detected.
DTC No.
DTC Detection Condition
Trouble Area
B1244
Malfunction of automatic light control sensor
Open or short of a ...
Diagnostic trouble code chart
If a DTC is displayed during the DTC check, check the parts
listed in the table below and proceed to the page given.
HINT:
*1: Comes on MIL (Malfunction Indicator Lamp) light up
*2: "DTC stored" mark means ECM memorizes the
malfunction code if the ECM detects the DTC detection
...
Back Sonar Sensor RH Circuit
DESCRIPTION
An ultrasonic sensor consists of a sensor portion that transmits and receives
ultrasonic waves and a preamplifier
that amplifies them. The ultrasonic sensor outputs the ultrasonic waves and
sends the received
signals to the clearance warning ECU.
WIRING DIAGRAM
INSPECTION PR ...