Toyota Sienna Service Manual: Installation
1. INSTALL REAR DOOR WINDOW FRAME MOULDING

- Remove the tape from the rear door window frame moulding.
- Clean the contact surface of the vehicle body with white gasoline.
- Clean the outer circumference of the rear door window frame moulding with white gasoline.
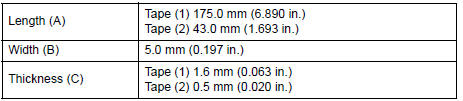
- Apply new double-sided tape to the rear door window frame moulding, as shown in the illustration.
Dimensions:

- Using a heat light, heat the vehicle body and rear door window frame moulding.
Heating temperature:

NOTICE: Do not heat the body and rear door window frame moulding excessively.
- Remove the peeling paper from the face of the rear
door window frame moulding face.
HINT: Be careful that dirt or foreign objects do not stick to the adhesive part when removing the peeling paper.
- Engage the 2 claws and install the rear door window frame moulding with the screw.
NOTICE: Do not apply excessive force onto the rear door window frame moulding, but steady pressure with your thumbs.
2. INSTALL REAR DOOR WINDOW REAR FRAME MOULDING
- Remove the tape from the rear door window rear frame moulding.
- Clean the contact surface of the vehicle body with white gasoline.
- Clean the outer circumference of the rear door window rear frame moulding with white gasoline.

- Apply new double-sided tape to the rear door window rear frame moulding, as shown in the illustration.
Dimensions:
- Using a heat light, heat the vehicle body and rear door window rear frame moulding.
Heating temperature:

NOTICE: Do not heat the body and rear door window rear frame moulding excessively.
- Remove the peeling paper from the face of the rear
door window rear frame moulding face.
HINT: Be careful that dirt or foreign objects do not stick to the adhesive part when removing the peeling paper.
- Engage the 2 claws and install the rear door window rear frame moulding with the screw.
NOTICE: Do not apply excessive force onto the rear door window rear frame moulding, but steady pressure with your thumbs.
 Removal
1. REMOVE REAR DOOR WINDOW FRAME MOULDING
Remove the screw.
Using a heat light, heat the rear door window frame
moulding between 40 to 60 C (104 to 140 F).
NOTICE:
Do not heat the rear ...
 Front fender garnish
COMPONENTS
...
Other materials:
Removal
1. RECOVER REFRIGERANT FROM REFRIGERATION
SYSTEM (See page AC-172)
2. REMOVE FRONT WHEEL RH
3. REMOVE FRONT FENDER APRON SEAL RH (See
page EM-26)
4. REMOVE V-RIBBED BELT (See page EM-6)
5. REMOVE RADIATOR AND FAN ASSEMBLY
(See page CO-28)
6. DISCONNECT DISCHARGE HOSE SUB-ASSEMBLY
(a) Re ...
Warning light and indicator light bulb check
(a) Check the warning lights.
(1) Release parking brake pedal.
(2) When the ignition switch is turned to the ON
position, check that the ABS warning light,
BRAKE warning light, VSC warning light, TRAC
OFF indicator light (2WD) and SLIP indicator
light stay on for approx. 3 seconds.
HI ...
Precaution for cooling fan system
NOTICE: • When the ignition switch is turned off and the
engine temperature is high, the cooling fans may
operate for approximately 3 minutes. • After turning the ignition switch
off, keep hands
and objects away from the fans when they are operating.
HINT:
If all of the following a ...