Toyota Sienna Service Manual: Removal
NOTICE:
- Do not adjust the brake booster push rod.
- Do not change the combination of the diameter converting unit and brake.
1. DRAIN BRAKE FLUID
NOTICE: Wash the brake fluid off immediately if it attaches to any painted surfaces.
2. SEPARATE BATTERY NEGATIVE TERMINAL
3. REMOVE AIR CLEANER ASSEMBLY WITH HOSE
4. REMOVE COWL TOP PANEL SUB-ASSEMBLY OUTER FRONT (See page SP-13)
5. REMOVE BRAKE MASTER CYLINDER

(a) Using SST, disconnect the 2 brake tubes from the brake master cylinder assembly.
SST 09023-00101
(b) Slide the clip and disconnect the brake master cylinder reservoir hose.
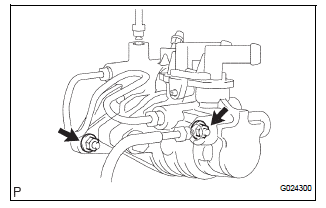
(c) Remove the 2 nuts and brake master cylinder.
 Brake master cylinder
COMPONENTS
...
 Disassembly
1. REMOVE BRAKE MASTER LESS RESERVOIR TANK CYLINDER SUB-ASSEMBLY
(a) Using soft jaws on the vise, hold the brake master
cylinder in a vise through aluminum plates.
(b) Using a screwdriver, re ...
Other materials:
Diagnostic trouble code chart
If a malfunction code is displayed during the DTC check,
check the circuit listed for that code in the table below.
(Proceed to the page given for that circuit.)
POWER SLIDE DOOR SYSTEM
DTC No.
DTC No. Detection Item
Trouble Area
B2223
Power Slide Door ...
Inspection
1. Inspect heated oxygen sensor (for bank 1
sensor 2)
(a) Measure the resistance of the sensor.
Standard resistance
If the resistance is not as specified, replace the
sensor.
2. HEATED OXYGEN SENSOR (for Bank 2 Sensor 2)
(a) Measure the resistance of the sensor.
Standard resistance ...
Stereo Component Amplifier Power Source Circuit
DESCRIPTION
This circuit provides power to the stereo component amplifier.
WIRING DIAGRAM
INSPECTION PROCEDURE
1 INSPECT STEREO COMPONENT AMPLIFIER
Disconnect the stereo component amplifier connector.
Measure the resistance according to the value(s) in the
table below.
S ...