Toyota Sienna Service Manual: Removal
1. PRECAUTION
CAUTION: Be sure to read "PRECAUTION" thoroughly before servicing.
2. DISCONNECT CABLE FROM NEGATIVE BATTERY TERMINAL
CAUTION: Wait for 90 seconds after disconnecting the cable to prevent the airbag working.
3. REMOVE STEERING WHEEL NO.3 COVER LOWER
- Using a screwdriver, remove the steering wheel No.3 cover lower.
HINT: Tape up the screwdriver tip before use.
4. REMOVE STEERING WHEEL NO.2 COVER LOWER
- Using a screwdriver, remove the steering wheel No.2 cover lower.
HINT: Tape up the screwdriver tip before use.
5. REMOVE STEERING PAD
- Using a "torx" socket wrench (T30), loosen the 2 "torx" screws until the groove along the screw circumference catches on the screw case.

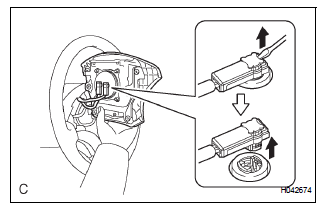
- Pull out the steering pad from the steering wheel
assembly and support the steering pad with one
hand as shown in the illustration.
NOTICE: When removing the steering pad, do not pull the airbag wire harness.
- Disconnect the horn connector.
- Disconnect the 2 connectors from the steering pad.
NOTICE: When handling the airbag connector, take care not to damage the airbag wire harness.
- Remove the steering pad.
 On-vehicle inspection
1. INSPECT STEERING PAD (VEHICLE NOT INVOLVED IN COLLISION)
Perform a diagnostic system check.
With the steering pad installed on the vehicle,
perform a visual check. If there are any defe ...
 Installation
1. INSTALL STEERING PAD
Support the steering pad with one hand as shown in
the illustration.
Connect the 2 connectors to the steering pad.
NOTICE:
When handling the airba ...
Other materials:
Rear Airbag Sensor RH Circuit Malfunction
DTC B1154/38 Rear Airbag Sensor RH Circuit Malfunction
DESCRIPTION
The rear airbag sensor RH circuit consists of the center airbag sensor
assembly and rear airbag sensor
RH.
If the center airbag sensor assembly receives signals from the rear airbag
sensor RH, it judges whether or
not the ...
Diagnosis display detailed
description
HINT:
This section contains a detailed description of displays
within diagnostic mode.
Illustrations may differ from the actual vehicle depending
on the device settings and options. Therefore, some
detailed areas may not be shown exactly the same as on
the actual vehicle.
...
Sound Signal Circuit between Radio and Navigation Assembly and
Stereo Component Amplifier
DESCRIPTION
The radio and navigation assembly sends a sound signal to the stereo
component amplifier through this
circuit.
The sound signal that has been sent is amplified by the stereo component
amplifier, and then is sent to
the speakers.
If there is an open or short in the circuit, s ...