Toyota Sienna Service Manual: Inspection
1. INSPECT OUTER REAR VIEW MIRROR ASSEMBLY LH (w/o Memory)

- Disconnect the mirror connector.
- Check operation of the outer mirror.
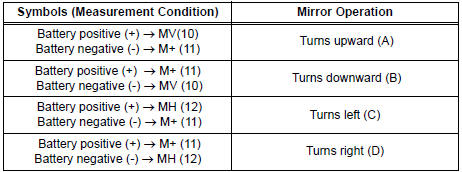
- Apply battery voltage and inspect operation of the mirror face, as shown in the table and illustration.
Standard (LH)

If the result is not as specified, replace the mirror assembly.
2. INSPECT OUTER REAR VIEW MIRROR ASSEMBLY RH (w/o Memory)
- Disconnect the mirror connector.

- Check operation of the outer mirror.
- Apply battery voltage and inspect operation of the mirror face, as shown in the table and illustration.
Standard (RH)

If the result is not as specified, replace the mirror assembly.
3. INSPECT OUTER REAR VIEW MIRROR ASSEMBLY LH (w/ Memory)

- Disconnect the mirror connector.
- Check operation of the outer mirror.
- Apply battery voltage and inspect operation of the mirror face, as shown in the table and illustration.
Standard (LH)
If the result is not as specified, replace the mirror assembly.

- Check operation of the EC mirror.
- Apply battery voltage and inspect operation of the mirror face, as shown in the table and illustration.
Standard (LH)

If the result is not as specified, replace the mirror assembly.
- Check of the retract function.
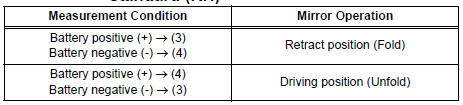
- Apply battery voltage and inspect operation of the mirror, as shown in the table and illustration.
Standard (LH)

If the result is not as specified, replace the mirror assembly.
4. INSPECT OUTER REAR VIEW MIRROR ASSEMBLY RH (w/ Memory)
- Disconnect the mirror connector.
- Check operation of the outer mirror.

- Apply battery voltage and inspect operation of the mirror face, as shown in the table and illustration.
Standard (RH)

If the result is not as specified, replace the mirror assembly.

- Check operation of the EC mirror.
- Apply battery voltage and inspect operation of the mirror face, as shown in the table and illustration.
Standard (RH)

If the result is not as specified, replace the mirror assembly.

- Check of the retract function.
- Apply battery voltage and inspect operation of the mirror, as shown in the table and illustration.
Standard (RH)
If the result is not as specified, replace the mirror assembly.
 Removal
HINT:
On the RH side, use the same procedures as on the LH side.
1. REMOVE FRONT DOOR SERVICE HOLE COVER LH
Remove the front lower frame bracket garnish LH.
Remove the front door i ...
 Installation
1. INSTALL OUTER REAR VIEW MIRROR ASSEMBLY LH
Install the mirror with the 3 nuts.
Torque: 8.0 N*m (82 kgf*cm, 71 in.*lbf)
Connect the connector.
...
Other materials:
Rear Air Mix Damper Position Sensor Circuit
DESCRIPTION
This sensor detects the position of the rear air mix control servo motor
(water valve servo motor) and
sends the appropriate signals to the A/C amplifier. The position sensor is built
in the rear air mix control
servo motor (water valve servo motor).
The position sensor's r ...
Precaution
1. REMOVAL AND INSTALLATION TIRE PRESSURE
WARNING VALVE AND TRANSMITTER
(a) When installing a tire, make sure that the tire
pressure warning valve and transmitter does not
interfere with the tire bead in order to prevent
damage to the tire pressure warning valve and
transmitter.
(b) After c ...
The keys
The following keys are provided with the vehicle.
Vehicles without a smart key system
Master keys (black)
Valet key (gray)
Key number plate
Vehicles with a smart key system
Electronic keys
Operating the smart key system
Operating the wireless remote
contr ...