Toyota Sienna 2010-2025 Owners Manual: “Contact/Call History Settings” screen
- Display the “Phone/Message Settings” screen.
- Select “Contact/Call History Settings”.
- Select the desired item to be set.
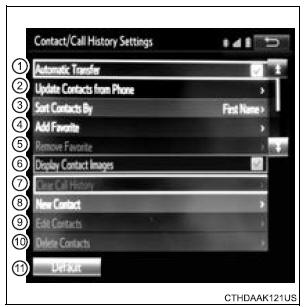
- For PBAP compatible Bluetooth® phones, select to set “Automatic Transfer” on/ off. When set to on, the phone’s contact data and history are automatically transferred.
- Select to update contacts
from the connected phone.
- Select to sort contacts by the first name or last name field.
- Select to add contacts to the favorites list.
- Select to delete contacts from the favorites list.
- Select to display contact images.
- Select to clear contacts from the call history.*
- Select to add new contacts to the contact list.*
- Select to edit contacts in the contact list.*
- Select to delete contacts from the contact list.*
- Select to reset all setup items.
*: For PBAP compatible Bluetooth® phones only, this function is available when “Automatic Transfer” is set to off.
 Contact/Call History
Settings
Contact/Call History
Settings
The contact can be transferred from a Bluetooth® phone to the system.
The contact also can be added, edited and deleted.
The call history can be deleted and contact and favorites can be
change ...
 Update contacts from phone
Operation methods differ between PBAP compatible and PBAP
incompatible but OPP compatible Bluetooth® phones.
If your cellular phone is neither PBAP nor OPP compatible, the contacts
cannot be tra ...
Other materials:
Vehicle lift and support locations
1. NOTICE ABOUT VEHICLE CONDITION WHEN
JACKING UP VEHICLE
(a) The vehicle must be unloaded before jacking up/
lifting up the vehicle. Never jack up/lift up a heavily
loaded vehicle.
(b) When removing heavy parts such as the engine and
transmission, the center of gravity of the vehicle
may s ...
TC and CG Terminal Circuit
DESCRIPTION
DTC output mode is set by connecting terminals TC and CG of the DLC3.
The DTCs are displayed by the blinking pattern of the ABS warning light.
WIRING DIAGRAM
HINT:
When warning lights continue to blink, a ground short in the wiring of terminal
TC of the DLC3 or an
internal ...
Operation check
NOTICE:
Inspection should be started after conforming that the
items listed in the "CUSTOMIZE PARAMETER" for the
power slide door system have defaulted to the initial
settings.
1. CHECK OPENING OPERATION
Conditions necessary for the power slide door to
open:
Power slid ...